Friday, 25 December 2020

3 layer scarp Christmas layout

Hello there,
Welcome to my blog and follow my work on social media. 

I tired something different this time for Christmas project. I made a three layer layout and used Ni Hao stamp set from Waffle flower. This is an awesome stamp set with cute images and can be used in different ways. I used the images and turned it into a Christmas theme where I added Christmas colours to the images and a Christmas picture as well. To finish it up,I added a sentiment near the dragon to make it look like the sentiment was coming from its mouth. 


Challenges entered:

Thank you for stopping by and hope you all enjoyed the project.
Stay happy and keep crafting.

Wednesday, 23 December 2020

Hattori tag

Hello there,
Welcome to my blog and follow my work on social media.

I am back on Le Anns World 101 inspiration blog this time using Hattori. I have a very simple tag to share today using this image. I have a colouful background and added a pattern paper along with yellow and black cardstock along with a sentiment and some liquid pearl drops. 


Thank you for stopping by and hope you all enjoyed the card.
Stay happy and keep crafting.

Friday, 18 December 2020

'Wings' - Bird house

Hello there,
Welcome to my blog and follow my work on social media.

“The reason birds can fly and we can’t is simply because they have perfect faith, for to have faith is to have wings.” - Isn't this a beautiful quote... 

I have a beautiful project to share here today and its a bird house made using pattern papers from Swati Craft Corner. The papers used here are Tropical paradise which is perfect for bird and tropical theme projects. The coordinating motif sheet has gorgeous elements that work perfectly with projects. 

I used heavy base chipboard to make the base and added the pattern papers. To add more elements, I used sand texture paste, green moss powder, natural fibre along with decostones and some birds which I got online. 


Challenges entered:

Thank you for stopping by and hope you all enjoyed the card.
Stay happy and keep crafting.

Thursday, 17 December 2020

Baby theme layout

Hello there,
Welcome to my blog and follow my work on social media.

I am so addicted to making layout these days and I love them. This time I am working with Bob N Betty Googly Woogly pattern paper along with mulberry flowers and stamps from Craftyscrappers. The stamp I used here is Its time to party and the cutest animal stamps which can be used for birthday or baby projects too. 

The paper pack has a sheet with tons of small elements to work with and sheets with journal cards too. I first gessoed the sheet first and then I added some colours using chalk paint and then layers of pattern paper. 

I started assembling all the elements together  and finished the layout with mulberry flowers and deco stones. 


Challenges entered:

Thank you for stopping by and hope you all enjoyed the layout.
Stay happy and keep crafting.

Tuesday, 15 December 2020

Baby theme journal page

Hello there,
Welcome to my blog and follow my work on social media.

It's the last challenge for this year and I have a baby theme journal page here for this month's challenge at The Creative crafters challenge

This page I made is different from the ones I always make. I used Twinkle Twinkle stamp set from Craftyscrappers. This image of the baby sleeping is the cutest and along with this image, I used elements from Swati craft corner. I did some watercolouring and stenciling for the background and added the images together along with the sentiment. 


Thank you for stopping by and hope you all enjoyed the card.
Stay happy and keep crafting.

Christmas Wishes

Hello there,
Welcome to my blog and follow my work on social media.

I am excited to share some cards I made using our new release - Christmas animals and Kindness. With Christmas around the corner these stamps are perfect to make cards and tags. 

CARD 1 - CHRISTMAS WISHES


I created a scene for my first card using Christmas animals
I took this super cute image from the set where the animals are riding back home with the tree and its snowing along the way
I stamped, coloured and fuzzy cut the image and kept them aside
For the background, I used Aqua blue ink and for the road, I used Lead grey and Jet black ink
Using white paint, I added small dashes for the road and used the same to splatter the snow
I die cut the street lamp and grass and added little white texture paste to gave the snow effect
Finally, I put in all the elements together and finished the card


CARD 2 - KINDNESS SPINNER


This is a super cute image to make a card for loved ones
I made a spinner card using the image where I did mirror stamping so the front and the back are the same
I die cut a circle from the card base and attached it using a thread so they can spin when the card opens
To finish the card, I added some black dashes and black dots and added the sentiment


CARD 3 - WINTER KINDNESS


This is a simple winter card using the same image from Kindness
After colouring and fuzzy cutting the image, I first inked the background using Chinese blue and Turquoise ink
While they were drying, I cut a snow pile from white glitter foam and white card carstock
I stamped some stars using black ink and splattered white drops to make it look like its snowing
I added the cardstock and then the glitter foam
To finish the card, I tucked the image between the snow pile and added the sentiment. 


Saturday, 12 December 2020

Magic of Winter - YouTube hop

Hello there,
Welcome to my blog and follow my work on social media. 

'To appreciate the beauty of a snowflake it is necessary to stand out in the cold'.. 
I love this quote and with this, I am happy to share my project made for Magic of winter - Youtube hop that is live now. 

I have used Winterland pattern paper from Mintay papers. I love this paper pack as it has all the elements of winter which will work perfectly for any Winter or snow or Christmas theme projects. The entire process is below in the video. 

Please do drop by and share the video as much as you can - https://youtu.be/uuXott6jmZk


Challenges entered:
http://inkspirationalchallenges.blogspot.com/2020/12/challenge-228-snow.html

Thank you for stopping by and hope you all enjoyed the card. 
Stay happy and keep crafting.

Friday, 11 December 2020

Rhythm of rain - 3D decoupage layout (Instahop)

Hello there,
Welcome to my blog and follow my work on social media. 

Making layouts are my favourite these days. When I decided to work with something new, I decided no matter what design I get, I will make a layout. 


We have an Insta hop happening now to celebrate the new launch of 3D decoupage papers launched by Craftreat. For my layout I used Rainy day blooms. To compliment the design, I went in for a rain theme layout. I used a girl dancing in the rain image to go along with the rain boots and umbrella and added some floral elements to finish the layout. 


CrafTreat 3D Decoupage Sheet gives a three dimensional view to your crafts.  A5 3D Decoupage paper contains 3 Sheets, the Base sheet contains main design and other two sheets consist of identical designs which replicate the designs in the first sheet. DIY Die Cut Decoupage Sheets can be cut down easily to form a three Dimensional Images. These 3D projects can be used along with decoupage, Fridge Magnets, Wall Hanging, Welcome Board, Name Board, Resin Coasters, paper weight and more. 

How to Use: Step 1: Take the Base sheet which contains Whole designs and Stick it with the help of glue to your preferred surface. Step 2: Cut down the Identical Images from the other sheet and keep it separately. Step 3: For three dimensional effects on the Surface, Use 3D Foam or Silicone glue to raise it. Step 4: Then place the identical cut outs on the surface. Let them dry for few minutes.


Challenges entered: 

Thank you for stopping by and hope you all enjoyed the card.
Stay happy and keep crafting.

Thursday, 10 December 2020

Let's celebrate - birthday cards

Hello there,
Welcome to my blog and follow my work on social media.

This is a special month of celebration for Tubby craft as we enter our 3rd year. We have a huge celebration going on and check it out HERE. To celebrate this milestone, I have 2 simple birthday cards that I am sharing here today. 

CARD 1


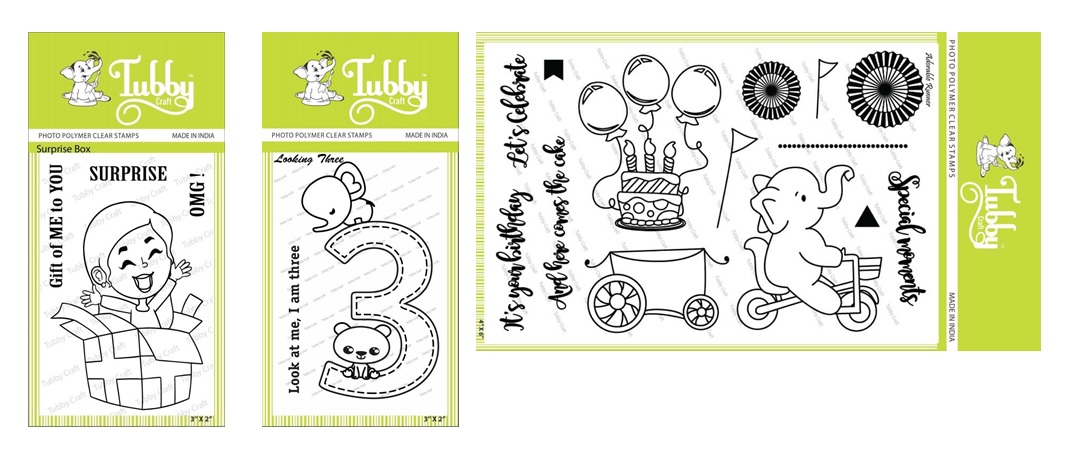
To make this card, I used Adorable runner and Looking three stamp sets
I stamped the images, coloured and fuzzy cut them out
I took a white card stock and stenciled using Crack it stencil and Turquoise and lawn green inks
Before adhering the images, I placed them to see how I wanted the alignment before adding the banners.
I drew the strings using a black pen and stamped the banner from Adorable runner set
Using double sided foam adhesive, I added the images to the card
I also used a twine to attached the bicycle and the cart


CARD 2

This is a super simple card and I used Surprise box and Adorable runner set
I stamped the images, coloured and fuzzy cut them out
I added pastel blue and green to the card base
I carefully fuzzy cut the balloons from the image (there is a cake also attached to the balloons and I didn't want the cake)
I added the balloon behind the girl,so it looks like the balloons are flying from the box when she opens it
I added a couple more gift boxes and finished the card using a sentiment


Products used
STAMPS
INKS

STENCIL


Thank you for stopping by and hope you all enjoyed the card.
Stay happy and keep crafting.