Showing posts with label pink fresh studio. Show all posts

Tuesday, 30 September 2025

Monochrome Mint Magic

Hello there, 
Welcome to my blog and follow my work on social media. 

I'm excited to share a project I created for the latest Pinkfresh Studio Challenge it's all about Teal, which is focused on monochrome designs! This challenge really pushed me to get creative with tone, texture, and dimension, all while sticking to a single color family. For my card, I chose a beautiful, calming mint/teal color palette, which gives the finished piece a clean and contemporary feel.

Focusing on Texture and Dimension
Since a monochrome card can easily fall flat without contrast, I focused heavily on incorporating texture and dimension using my favorite Pinkfresh Studio dies - Foliage shaker die

 * The Background: I started with a light teal cardstock that has a subtle, where I cut out strips of same cardstock and added it diagonally. This texture provides a great foundation and visual interest without competing with the main elements.

 * The Die Cuts is the focal point: The star of the post is the leaf die cut. I did some die cut inlay technique using two more shades of teal. Placing the leaves in the four corners helps frame the central sentiment beautifully. The remaining die cut pieces I stacked them together and added to the center and finished with a sentiment. 

To finish the look, I added a few subtle gold embellishments—tiny metallic dots placed strategically on the leaves and around the sentiment. They catch the light and add a tiny bit of sparkle without breaking the monochrome rule. 

This project was a fantastic exercise in using different shades and materials within one color family to create depth. I love how the cool tones make this a perfect card for anyone, year-round!


Challenges entered: 

 Thank you for stopping by and hope you all enjoyed the card. Stay happy and keep crafting.

Wednesday, 17 September 2025

Tone-on-Tone Perfection

Hello there,
Welcome to my blog and follow my work on social media. 

There's something so satisfying about a project that uses a limited color palette. It forces you to focus on texture, layering, and subtle variations in shade. That's why I was so excited for the Pinkfresh Studio "Tone-on-Tone/Monochrome" challenge. I knew I wanted to create a card that was both sophisticated and heartfelt.

I chose to work with a range of rich browns, from a deep chocolate to a creamy beige. I started by heat embossing a gorgeous floral stamp from Pinkfresh Studio onto a brown cardstock panel. This technique creates a beautiful, raised design that adds incredible texture without needing another color. The sentiment, "Smiles & Hugs," was also heat embossed to match.

For the background, I cut several strips of cardstock in varying shades of brown and adhered them to the bottom of the card. This simple striping effect adds visual interest and a subtle ombre feel, all while staying true to the monochrome theme. I love how the different shades of brown play together, and the embossed details truly make the flowers shine. If you're looking for a new way to get creative, I highly recommend giving a tone-on-tone project a try!


Challenges entered:

Thank you for stopping by and hope you all enjoyed the card.
Stay happy and keep crafting.

Sunday, 24 August 2025

Birthday roses

Hello there,
Welcome to my blog and follow my work on social media. 

I'm excited to share a beautiful birthday card project today that features some absolutely stunning products from Pinkfresh Studio. This design focuses on creating depth with die-cuts and making beautiful florals pop against a geometric background.

The Geometric Backdrop: Dimensional Die-Cutting
The true star of the background is the gorgeous Twist Pattern Die from Pinkfresh Studio. This die is quickly becoming a favorite for creating sophisticated, textured backdrops!

 Creating Depth: To achieve that wonderful, substantial feel, I employed the technique of stacking. I die-cut the Twist Pattern multiple times using white cardstock and adhered them together for fantastic dimension. This makes the background a focal point in itself.

 A Touch of Shine: The top layer was cut from silver cardstock. This metallic touch catches the light and adds a level of elegance and celebration perfect for a birthday card.

 Shaping the Edge: A wonderful finishing touch was using the geometric pattern to shape the card itself! I cut the ends of the top-fold note card to follow the line of the die, giving the entire piece a custom, polished look.

The Focal Point: Stamped and Colored Roses
Against the cool, crisp silver and white background, the vibrant florals really come to life.

 The Stamp: I used the beautiful rose cluster image from the Choose Hope stamp set (Pinkfresh Studio) as my main embellishment.

 Coloring: The roses were colored in soft pink tones, contrasting perfectly with the yellow and green used for the leaves. This coloring method ensures the flowers are the first thing your eye is drawn to, providing warmth and softness against the geometric framework.

Final Touches
The card was finished with a clean sentiment and a scattering of subtle embellishments to echo the sparkle of the silver cardstock. These final details tie the whole piece together, creating a balanced blend of intricate die-cutting and gorgeous hand-colored florals.


Challenges entered:

Thank you for stopping by and hope you all enjoyed the card. 
Stay happy and keep crafting.

Sunday, 27 July 2025

Summer layout

Hello there,
Welcome to my blog and follow my work on social media. 

Today, I’m excited to share a scrapbook layout that perfectly captures the bright, refreshing energy of summer. While I love detailed projects, sometimes a clean and simple layout is the best way to let your memories (and your supplies!) shine—plus, they are so much easier to store!

To bring this vibrant layout to life, I reached for some gorgeous products from Pinkfresh Studio. The combination of yellows, greens, and blues immediately screams summer!

 * Summer Elements: I focused on two classic summer motifs: lemons and sunflowers. I used the Lemons & Blueberries stamp set and the Sunflower Washi Tape stamp to create my colorful embellishments. After stamping the images, I colored them in bright yellows and crisp greens before taking on the task of fussy cutting them out—it’s always worth the effort for that custom look!

 * Color-Matched Die-Cuts: To ensure the background elements flowed with the sunny theme, I incorporated die-cuts from both the Spiral Circle Die and the Twist Pattern Die. Before adhering them, I took the extra step of inking the die-cut pieces with coordinating yellow and green inks to seamlessly blend them with the lemons and leaves. This trick adds subtle texture without competing with the photos.

The Power of Simple Design
My goal for this layout was to keep the focus clean while using multiple layers of die-cuts and stamped images.

 * Background Building: I layered the delicate die-cuts on the page, using their intricate patterns to frame the space for the photos and title.

 * Placement Magic: Sometimes, the best way to finalize a design is to step away! I came back to the project with fresh eyes and immediately found the perfect arrangement for the colored elements, allowing them to cluster beautifully around the focal points.

 * Finishing Touches: The title was created using an Alphabet stamp and die set, keeping the typography clean and complementing the geometric background. The overall look is one of effortless summer joy!


Challenges entered:

Thank you for stopping by and hope you all enjoyed the layout. 
Stay happy and keep crafting.

Friday, 27 June 2025

Simple layout

Hello there,
Welcome to my blog and follow my work on social media. 

Today’s project is all about proving that a scrapbook layout can be both stunning and incredibly simple to put together. I call this my "Simple Layout," and it's built around vibrant rainbow colors and a clean aesthetic.

For this project, I turned to my trusty stamps and dies from Pinkfresh Studio to bring the cheerful color palette to life.

1. The Custom Rainbow Background
Instead of messy ink blending, I took a more streamlined approach to the main background element.
 * Digital Design: I first worked out the unique, fan-like shape of the rainbow background digitally. This allowed me to perfectly plan the shape before committing to paper.
 * Printing & Texture: After printing the custom rainbow design, I added subtle dimension by incorporating score lines. This simple scoring adds fantastic texture and makes the paper catch the light beautifully, giving it a handcrafted touch even though it was digitally created.


2. A Touch of Vellum Elegance
To add delicate detail and break up some of the bright color, I used a piece of vellum. Vellum is perfect for adding layers without adding visual weight.
 * White Heat Embossing: I stamped sentiments or small details onto the vellum and used white heat embossing. The crisp white against the translucent vellum adds a beautiful, sophisticated element that really pops.


3. The Focal Point
The layout was finished by layering all the elements around the main photograph. By keeping the stamping and die-cutting simple and linear, all the focus stays right where it should be—on the memory! The combination of the clean photo frame, the vibrant rainbow, and the soft vellum creates a perfect balance.


Saturday, 14 June 2025

Rainbow layout

Hello there,
Welcome to my blog and follow my work on social media.

I am thrilled to share a colorful new scrapbook layout today, themed around the beautiful and cheerful rainbow (VIBGYOR) palette. This project uses bold colors, stunning florals, and contrasting techniques to celebrate a special memory.
For this layout, I utilized a fantastic array of stamps and dies from Pinkfresh Studio.

Building the Vibrant Background
The foundation of this layout is a striking, textural rainbow design, perfect for adhering to the Pinkfresh Studio monthly challenge.

 * Fringe Background: I took leftover cardstock scraps in the VIBGYOR colors and cut them into strips. I then created fringe cuts along one edge of each strip. These fringed strips were then stacked and adhered in rainbow order to form a dynamic, textured background for the photo.

Layered Florals and Die-Cuts
To complement the bright background, I created contrasting layered elements using florals and delicate foliage dies.

 * Foliage Dimension: I used the Foliage Shaker Die to cut delicate pieces from two contrasting materials: translucent vellum and shimmering silver cardstock. Layering these pieces adds subtle texture and shine around the photo.

 * Contrasting Sunflowers: The beautiful Sunflower Washi Tape Stamp was the focal point for the stamping.

   * Vellum Embossing: I stamped the sunflowers onto a vellum sheet and heat embossed them with crisp white embossing powder.

   * Bold Black Contrast: For a dramatic effect, I also stamped the sunflowers onto black cardstock and heat embossed them in white. I then added just a mild shading of color to the black embossed flowers, allowing the strong contrast of white on black to dominate.


Finishing the Layout
The final arrangement places the two contrasting photo prints nestled among the layered foliage and bright florals. The page is finished with a simple sentiment and a few sparkling gemstones to tie in with the silver accents.
This layout perfectly blends a cheerful rainbow theme with sophisticated techniques like heat embossing and dimensional die-cutting, resulting in a fun, layered, and memorable piece.

Tuesday, 17 September 2024

Cosmos birthday card

Hello there,
Welcome to my blog and follow my work on social media.

I am happy to share another card with kraft cardstock colouring. I love colouring on kraft cardstock and didn't expect that colours will be so bright and I would enjoy the process. 

This is a one layer top fold card and I used Cosmos from Pinkfresh Studio and I off-set the stamp towards the top of the card. I coloured them using Lyra colour pencils and kept the card very simple with some silver splatters and sentiment. 


Challenges entered:

Thank you for stopping by and hope you all enjoyed the card.
Stay happy and keep crafting.

Monday, 22 July 2024

Sparkle all the way

Hello there,
Welcome to my blog and follow my work on social media.

(SCROLL DOWN TO SEE CLOSE UP OF CARD)

Lets make a card using Geo arch stencil and Foliage shaker die from Pink fresh studio. Its not the usual card I always make but there is a twist here. Lets start with stencilling first. Its a layered stencil and I used 3 colours for stencilling and creating a base. I kept it aside and did some die cutting using foliage shaker die. I used a very thin cardstock and hence had to do quiet a few die cuts. One die cut I did using silver sparkle cardstock. I stacked them all together and let them dry under some heavy weight. While they were drying, I drew two hexagons on the stencilled base and cut them out. I pasted the rest of the base to a top fold white note card and used double sided foam adhesive to add the hexagons as they will give some dimension and beautiful effect to the card. I finished the card with a sentiment and some gemstones. 


Challenges entered:
https://www.pinkfreshstudio.com/blogs/card-making-challenges/july-2024-challenge

Thank you for stopping by and hope you all enjoyed the card.
Stay happy and keep crafting.

Magnolia birthday

Hello there,
Welcome to my blog and follow my work on social media.

Magnolias are a wonderful choice for a birthday card theme! Their elegant, large blooms and subtle fragrance make them a symbol of beauty and grace. Magnolias are famous for their large, showy flowers, which can be white, pink, purple, or yellow. The flowers usually have a distinct, pleasant fragrance and are often large and cup-shaped or star-shaped. They have broad, glossy, and evergreen or deciduous leaves, depending on the species. Magnolias symbolize beauty, strength, and perseverance. The magnolia is also associated with dignity and nobility. 

For my card today, I am using Magnolia stamp & coordinating dieTulip love cover die and Spiral circle die. I used all the images from the stamp set, coloured and die cut. For the card base, I used cover plate die along with circle die which I die cut using sparkle gold cardstock. I finished the card with some gemstones and a sentiment


Challenges entered:

Thank you for stopping by and hope you all enjoyed the card.
Stay happy and keep crafting.

Friday, 19 July 2024

Sunflower layout

Hello there,
Welcome to my blog and follow my work on social media.

I am back here with a layout this time using Sunflower washi tape stamp and Foliage shaker die from Pink Fresh Studio. Pink fresh is one of my favourite companies as their stamps are dies are different from usual and they have a very fresh take on their products. They have a wonderful design team as well. 

I am playing along with fellow crafters on this month's challenge at Pink fresh studio. When it comes to taking part in challenges I never think about winning and just to see my work in the entry gallery. This month the theme being geometric, I worked with circles and tiny squares. I die cut circles and partially inked them and added some interest using alcohol markers. 

I coloured the flowers and leaves and die cut some foliage dies as well.. I placed all the elements to see how to work about with layout. I splattered some inks on the background and the pasted all the elements together. I finished up with sentiment and some gemstones. 


Challenges entered:
https://www.pinkfreshstudio.com/blogs/card-making-challenges/july-2024-challenge

Thank you for stopping by and hope you all enjoyed the layout.
Stay happy and keep crafting.

Tuesday, 30 January 2024

Cosmos Floral bunch

Hello there,
Welcome to my blog and follow my work on social media.

Lets make a card using Cosmos bunch stamp and Floarl grid coverplate die from Pink Fresh Studio. Its a beautiful floral bunch and perfect for making a card. For my card, I coloured with pencils and fuzzy cut the floral. For turn it into a card, I used cover plate die and added a sliver glitter cardstock on side and the die cut to a black top fold notecard. I finished the card with a sentiment and a couple of jewels to the center of the flower. 


Challenges entered:
(April - Flowers)

Thank you for stopping by and hope you all enjoyed the card.
Stay happy and keep crafting.

Friday, 26 January 2024

Rainbow layout

Hello there,
Welcome to my blog and follow my work on social media. 

I am here with a colourful layout and playing for Pink fresh studio challenge. For the layout I used using Sunflower washi stamp set with coordinating Sunflower washi layering stencil along with Spiral circle die and Foliage shaker die and Curvy leaf die. I stamped and stencilled the flowers and die cut leaves and circle. For the base and background, I coloured a white cardstock that's 12 x 12 with rainbow colours where I took mini ink cube and just swiped the colours and then added the photo, stamped and cut flowers and dies. I finished with some jewels and sentiment. 


Challenges entered:
(April - Flowers & May - Rainbows)

Thank you for stopping by and hope you all enjoyed the layout.
Stay happy and keep crafting.

Wednesday, 24 January 2024

Sunflowers bloom

Hello there,
Welcome to my blog and follow my work on social media. 

I am back with another card using Sunflower washi stamp set with coordinating Sunflower washi layering stencil and for the background Geo arch stencil from Pinkfresh studio. I love sunflowers and they are my favourite. I always find a reason to use sunflowers stamps when I can. This set I bought a while back and feel its amazing for cards and scarp layout. I didnt colour the flowers and instead used stencil to colour them. 


Challenges entered:
(combining April (flowers) and October (ombre) challenge)

Thank you for stopping by and hope you all enjoyed the card.
Stay happy and keep crafting.

Monday, 26 June 2023

Summer fun

Hello there,
Welcome to my blog and follow my work on social media.


I am super excited to share a layout I made for my darling niece using Infinite bloomsSweet friendGeo arch stencil, Curvy leaves die  and Ornate circle die. She is currently in vacation mode and this is an old picture of hers from last year when she was holiday. I love summer holidays. When I was in school I used to have 2 months of vacation and it was always fun. I used to attend summer camps and laze most of the time. I never used to get up before 9.30 in the morning and would just wait for my mom to cut mangoes for me. When I started college all of summer holidays I used to study study study.. I really miss doing nothing LOL...... I am happy my niece and nephew are enjoying their holidays and this is one for her.. 


Challenges entered:

Thank you for stopping by and hope you all enjoyed the layout. 
Stay happy and keep crafting.

Wednesday, 26 April 2023

April bloom layout

Hello there,
Welcome to my blog and follow my work on social media.

I am back here with a layout using Choose hopeMagnolia and Curvy leaves from Pink fresh studio and there is a lot in this layout. I was completely lost on how to make the layout or where to start. I was on Pinterest and Instagram searching on how to start and what stamps to use. I have a few stamps with me and decided to work with them for the layout. I ended up getting inspired by the team layout and worked along with it. I used distress oxide inks for inking 6 square die cuts with Wild honey, Picked raspberry and Peeled paint. I coloured the flowers and inked the die cut leaves. I started arranging all the elements and it took a while to decide on the layout. Once I decided, I started pasting them all together and finished with some pearls. I added die cut sentiment to finish up the layout. 


Challenges entered:

Thank you for stopping by and hope you all enjoyed the layout.
Stay happy and keep crafting.

Tuesday, 28 March 2023

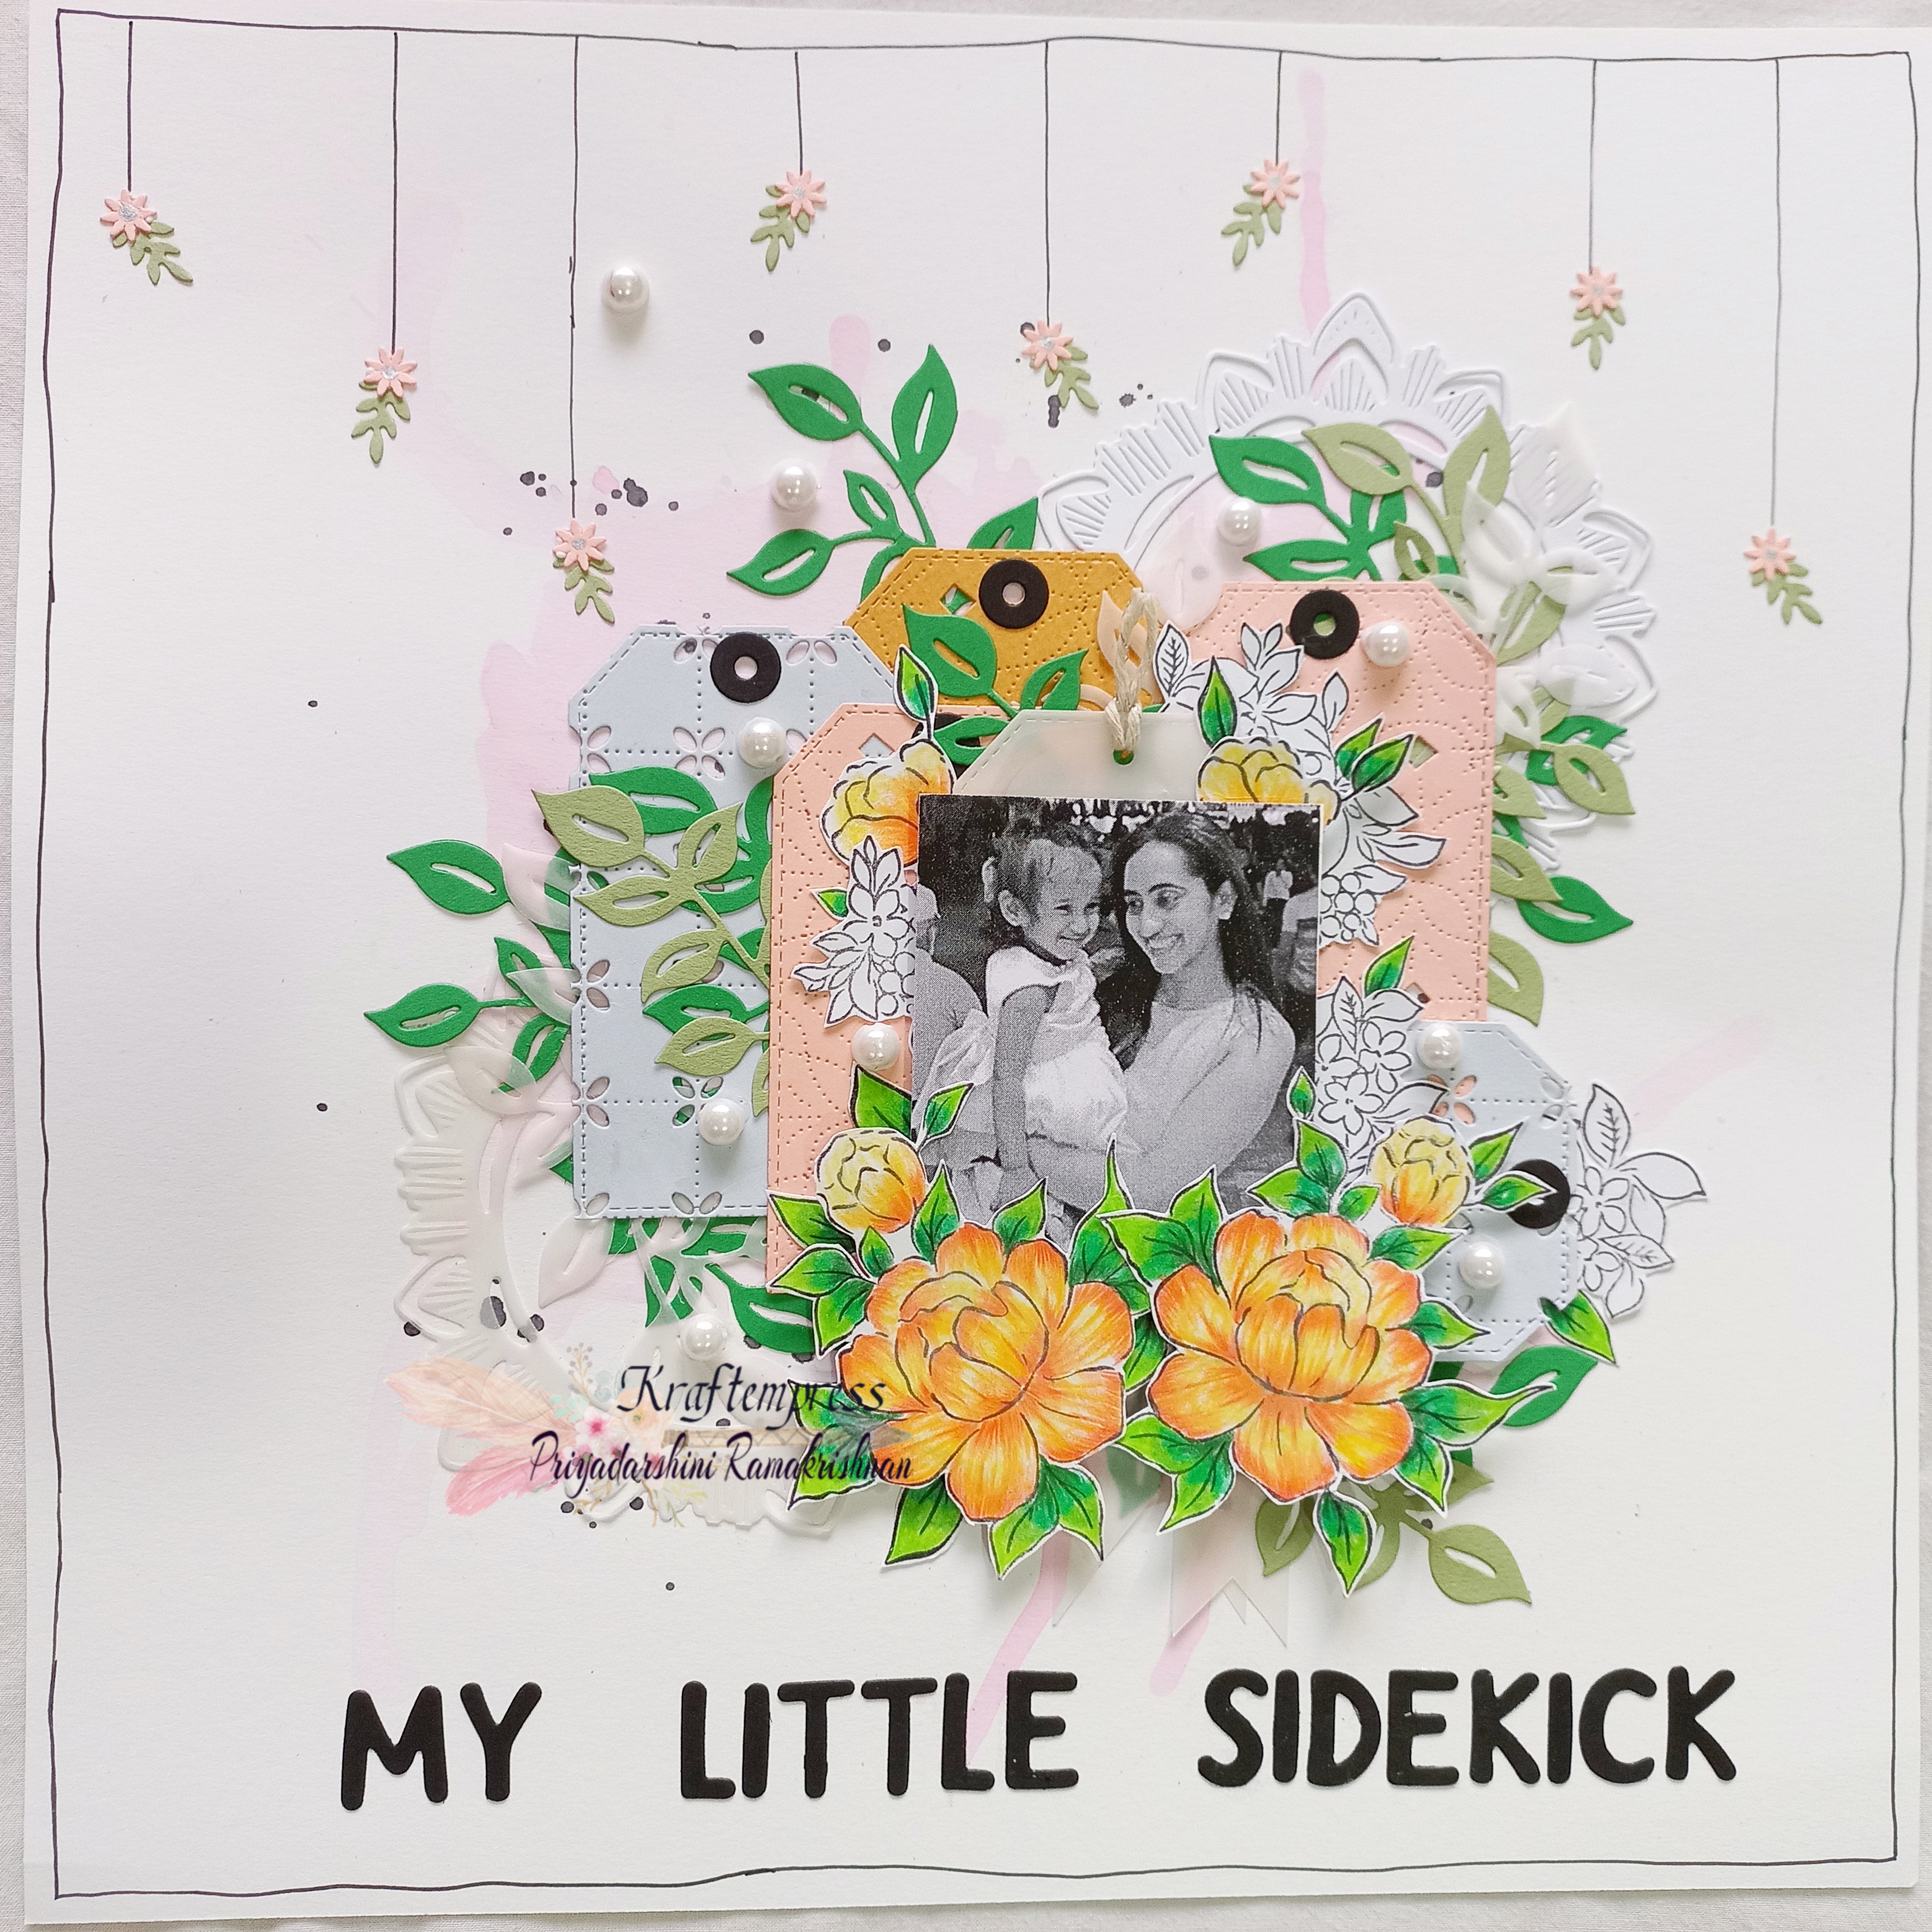
My little sidekick layout

Hello there,
Welcome to my blog and follow my work on social media.

I am here with a layout and I call it My little sidekick who is my cute little niece. She is full of energy and fun and extremely naughty. As an aunt, I love her too much and decided to make a layout using our picture. I am playing with Pink fresh studio monthly challenge and using a products from Pink fresh. I the theme is layers and I have a few layers here stacked up. I used Choose hope, Ornate medallion cover die and Floral grid cover die for giving texture to the die cut tags along with Curvy leaves die and Ornate circle die. I die cut pieces from cardstock and vellum sheet and added my picture and the coloured image and finished the layout with pearls and die cut sentiment. 


Challenges entered:

Thank you for stopping by and hope you all enjoyed the card.
Stay happy and keep crafting.

Friday, 27 January 2023

Flutter by

Hello there,
Welcome to my blog and follow my work on social media.

I am back with another card for this month's challenge and I am going with products from Pink fresh studio Butterflies and Essentials: Nested Chevron die. I used the large butterfly from the stamp set and coloured with blue and green colours. I took shades of purple ink and inked a white cardstock and inked it like its a ombre. I used nested chevron die and die cut the inked cardstock. I first stacked the pieces and for in between I used foam adhesive for dimension. Using a double side tape, I added the butterfly and finished with gemstones and sentiment. 


Challenges entered:

Thank you for stopping by and hope you all enjoyed the card.
Stay happy and keep crafting.

Pink flowers

Hello there,
Welcome to my blog and follow my work on social media.

I am back with another card for this month's challenge and I am going with products from Pink fresh studio Choose hope and Coverplate floral grid die. I stamped the floral twice and coloured with pink colour and green for leaves. I die cut the cover plate die using a white cardstock and added it to a pink cardstock and added the flowers and leaves together. I finished the card with gemstones and sentiment. 


Challenges entered:
https://www.pinkfreshstudio.com/blogs/card-making-challenges/january-2023-challenge -- August- beautiful background and May - anything spring

Thank you for stopping by and hope you all enjoyed the card.
Stay happy and keep crafting.